Making night light source seemed to glow like a star makes our night photos look better. This effect is usually called a starburst effect. To create a starburst, the fundamental thing we must understand is makes the aperture as small as possible, it means we should use a large aperture number (f/11 up to f/22) and should utilize a lens that has a shorter focal length.
Why should it be like that? well, the explanation would be long. In short is the physics of light will experience diffraction (spread) as it passes through a narrow hole. Nature of the propagation of light is what makes the light source (lamp, moon, sun) will look glowing and has a tongue, the tongue amount will depend on the number of aperture blades in your lens, see spec lenses you have, there will be written "aperture blade".
If still unclear, please see the following picture:
The image above shows, the smaller the aperture (the larger the f number), the tongue will light up. While in a small f number, the visible light source with no burst at all.
Tips for Night Photos Starburst:
1. Use a Tripod - Taking photos at night with a large f number, for example photo above to f/18, shutter speed will makes very long time, over 25 seconds bfoto why. So make sure you use a tripod so the images are not like painting graffiti.
2. Notice the camera settings - For type of photos like this, use a large f number: f/11 or greater. Set the ISO at a low rate, below 400, because we will be shooting long exposure. You can use the manual mode or aperture priority, which clearly notice the camera metering. For night shooting as there is a tendency to over-exposure results (too bright), so use exposure compensation figures vary depending on the surrounding environment, try to use as under 1 stop early and adjust afterwards.
3. Setting Focus - With a large aperture number, we will not think too much about focus, but if you want to safely take the focus point manually, or set at infinity.
4. Take advantage of the camera alerts highlight - you know, right? The bling-bling you know which a warning appears on the LCD when we are shooting a bright subject.
5. Start Taking photos - and do not be lazy to repeat and change the settings if the results are not as desired.

1. Use Tripod.
If our camera swayed when shooting and moving, must be hard to produce images sharply. So buy and use a tripod. Make sure you buy a sturdy and stable tripod.
2. Do not Forget Head Tripod.
Do not forget the tripod head. Tripod head is almost as important as the tripod itself. Make sure you know what are the considerations when choosing a tripod head.
3. How to Hold the Camera?
When not using a tripod, learn how to hold the camera properly so the camera is more stable and is not easily swayed.
4. Use the cable release.
Cable release can make us do not need to press the shutter button with our hands, thus reducing the possibility of camera shake. Cable release can be shaped cable that is physically attached to a camera that is more sophisticated and use a wireless remote.
5. Make the Camera Timer.
Do not have a tripod? Forgot to buy a cable release? Hmmm, just use the default camera timer. Trying to find a way to activate the self timer feature, each camera is equipped with features surely.
6. Mirror Lock Up
If you are using a DSLR camera, the camera is equipped with a mirror that allows you to display the image in the viewfinder. Almost all DSLR cameras feature which can lock the mirror, so as not to swayed, when the camera took the exposure, this feature is usually called mirror lock up. Enable this feature, because the wobble mirror, can have an effect on sharpness (though not always). If you use mirrorless cameras? mirror-less means no mirror, you know.
7. Activate Stabilizer Lens or Camera
Image stabilization, vibration reduction, whatever its name can be used to increase the sharpness of the image. This feature was available in or attached to the camera lens. Note that there IS / VR which need to be adjusted when you use a tripod.
8. Best buy the lens, the you can afford.
If you want good sound, buy the best sound system. If you want a speeding motorcycle, buy the best bike. If you want sharp photos? buy the best lenses. Best lenses which fairly cheap? 50mm lens.
Wedding Photography Tips For Amateur.
1. Create a 'Shot List'
This might be one of the most useful tips on Wedding Photography, for the amateur or professional already, that is: ask the couple so make a list of closest family, or friends that they want to be photographed later on the wedding day, so it is not screwed, while shooting a wedding begins. There is nothing worse, than the photographer forgot to take pictures of the happy couple with a family or a close friend!

2. Wedding photography Family Coordinator
Family photograph can sometimes make us very stressful you know!. Many invited guests who arrive without us knowing who they are, whether relatives or others???. The solution if you feel confused, it is better to look for one of the family members of the bride (or one for each side of the family) that can be "the director" at the photocall. The "the director" can sort out which family and which ones are not, and of course it helps you in photoshoots and keep the things that are not desirable.
3. Investigate the Location
Visit the location and the exact spots where you will take a shot before the day is important. While most professional photographers do not do this - but it can really help you to have an idea of a few positions for a photo shoot and find out how light can play along.
4. In Wedding Photography, Preparation is the key
So many things could go wrong on the day of the wedding - so photographers need to prepare everything carefully and well. Photographers must have a backup plan (if at any time the weather can turn bad), have a spare battery, spare memory card, know a quick route to get to the location.
5. Give the best results to married couples.
Show your work in a professional manner. The photographer must know what they want, how much snap photos as they want, whether there are important things that they want to note, how will the end result, what will they get from the photographer. If you can skip it all well, make sure you have the price of the deal, from the beginning.
Wednesday (04/10/2013), Olympus, a Japanese technology company, officially launched the underwater camera for the Asian market. Named TG-2, Olympus Company, presenting a waterproof camera, without prejudice to the quality of the image sharpness.
Series update of the TG version reportedly has increased capacity utilization in the water, to a depth of 15m. TG-2 armed with 12MP resolution camera with CMOS sensor, and a 4 times optical zooming capability.
Claimed to have the same level of image quality Digital Camera Lens Reflect (DSLR), waterproof camera is even equipped with capabilities exceeding DSLR, with Microscopic Microfunction. This capability can make you who like shooting Macro, getting the images with amazing detail.

Olympus Stylus TG-2 equipped with waterproof capability to the depth 15 meters and resistant to shocks or falls from a height of 2 meters. Additionally, this digital camera can be operated at a temperature of minus 10 degrees Celsius, and resistant to dust and pressure up to 100 kgf.
Olympus Stylus TG-2 using a f2.0 lens with a 12 megapixel CMOS sensor IHS is able to produce high quality photographs. Intake of moving objects, or in low-light conditions is also able to do well by this camera.
Olympus Stylus TG-2 also features Olympus Image Share, which can help facilitate the user to split the shots into social networking. The Olympus Tough TG-830 iHS is priced at $280
With the development of photography technology nowadays, a wide range of products offered in the market. One such example is digital camera. Although no longer a luxury, but there are still many people who do not understand how to use. But if there is a way which determines its use, not a few who know how to care for the digital camera to avoid damage and live longer. . Here is camera maintenance tips to be able functioning properly and optimally, as well as live longer.
1. Avoid direct contact with sunlight.
Take care your digital camera, do not get sunburnt or exposed to direct sunlight and excessively. Because high heat can damage the camera's parts which made of plastic and rubber and other electronic components.
2. Take care your digital camera in order to avoid excessive shock.
Do not forget to put it in a special bag for the camera, in order to avoid excessive shocks by external environment and the clashes between equipment.

3. Clean the camera and lens.
Camera should be cleaned once a week or on a regular basis and periodically. For the physical part of the camera, use a clean dry cloth and not grainy. While the inside and small elements, use a blower which widely sold in camera stores.
4. Avoid scratches on the lens.
To avoid scratches, lens should have a filter thread, which attached permanently on the front. Common filter is a type of protective UV filter (ultraviolet), or skylight filters. Meanwhile, to avoid scratches on the back of the lens, try to always put bodycup when the lens cover is removed from the camera body.
5. Avoid sea water.
The sea water is very malicious and potentially cause rust to cameras or other electronic devices. Unless specifically designed for saltwater. If one day, your camera is accidentally splashed into the sea water then soak your camera directly into fresh water, then rinse several times to remove former sea water. Then taken immediately to a camera repair specialist to clean.
6. Do not be too often clean the lens, or clean the inside when moldy. Because glass is so sensitive lens. Therefore lenses are cleaned more often, can result in poor image quality.
7. Do not store digital camera, in the wardrobe. Because it can invite fungus that attaches to the inside of the camera lens.
Photographing fireworks can be a challenging activity, but not be too difficult. Here are some tips that you can try into practice, to capture the fireworks attraction, and may inspire you to create your perspective.
1. Turn off the flash and set the camera to manual mode. This allows you to control the exposure and aperture of yourself. A good point to start is at ISO 100, f/11, and shutter speed 1/2 sec. If it turns out the photo looks too dim, vary the shutter speed but keep the numbers remain the same aperture.
2. If you're going to photograph the fireworks show at an event, come early to get a place with a comfortable vantage point. Before the show started, think about the elements at the front and background and how you want to combine both. Adjust the focus menual before began to get dark sky. Focus on one part of the sky that you think will be filled by a fireworks explosion, or on an object about the same distance with fireworks. Once the show begins, you are ready to shoot.
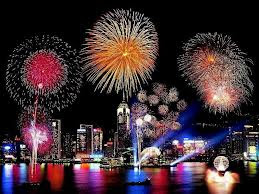
3. Long exposure required for photographing fireworks, and this means that the shutter speed should be slow. Keep your camera stability by using a tripod and shutter release. When photographing landscapes, which is not only composed of the sky but also the other elements of a sort of cityscape, keep the horizon line straight. Make sure your camera on a tripod perfectly flat.
4. Try creating a varied picture. Focal length you need, depending on the distance from the center to the end of the fireworks explosion. If you want a solid picture and details of the fireworks show, you need to use a zoom lens, the size is about 200mm. Remember that changing the focal length will require resetting focus on most zoom lenses. Please check this before the show began and when the sky is still bright.
5. A great way to photograph fireworks explosion on top is to use the bulb mode. This will allow you to make the exposure based on changing conditions, not a timer. You will need a shutter release to prevent camera rocking. Press the shutter button while gliding fireworks, and keep it held down until the blast disappeared from the sky. Usually a few seconds.
Thus, the tips that I know, about how to take photos of fireworks. Hopefully useful
Recently, Nikon present the new digital camera in the UK. That is one of the Coolpix series a comes with a label Nikon Coolpix S3500. Present in the packing attractive colors, the Coolpix S3500 has a variety of nice features, such as wide-angel zoom lens of 7x NIKKOR, LCD screen 6.7-cm (2.7-in.), Lens-shift vibration reduction, 720p video recording capabilities as well as camera filter effects.
Coolpix S3500 objects created to capture images in a fun way. Wrap Automatic Focus feature, and Vibration Reduction technology is able to reduce the movement when shooting, consequently resulting image quality Coolpix S3500 clearer and sharper. While the wide-angle lens with optical zoom can help shoot close-ups easily.
Wrapped with a slim 20.5mm body plus 7x optical zoom NIKKOR lens and vibration dampening technology support, the Nikon Coolpix S3500 is claimed to produce crystal clear video quality and steady. With a choice of 18 scene modes automatically optimize the camera settings are able to capture the image. While the Smart Portrait System offers automatic detection technology to ensure images perfectly.
Additional features 20MP CCD sensor which is able to provide enough resolution for printing images on a large scale. You can share photos online via the Eye-Fi X2 application which can send images in JPEG format to mobile devices and PC.
Nikon Coolpix S3500 will be available in 8 variants of colors like purple, silver, black, red, orange, pink, pink with lineart, and blue with the lineart.
In the UK this digital camera is available at a price of £ 129.99
Sony Cyber-shot DSC-WX80 digital camera mentioned as a successor to the WX70 which has been launched last year. Sony Cyber-shot DSC-WX80 is equipped with lenses that are strong enough and the quality WiFi support.
With the WiFi feature, the user can share the picture to a certain range of social media sites using a smartphone and tablets which running the Sony PlayMemories Mobile application.
Some of the features are embedded, image sensor Exmor R back-illuminated 16.2 Megapixel CMOS enabled, and the BIONZ image processing engine combined with ISO sensitivity up to 12,800. Sony Cyber-shot DSC-WX80 is also equipped with a Carl Zeiss Vario Tessar lens with 8x optical zoom and image stabilizer feature Optical SteadyShot with Active mode 2 direction.
Specifications and Features of Camera Sony Cyber-shot DSC-WX80:
1. Image sensor Exmor R back-illuminated 16.2 Megapixel CMOS enabled
2. BIONZ image processing engine
3. ISO sensitivity up to 12,800
4. Carl Zeiss Vario Tessar lens with 8x optical zoom
5. features Optical SteadyShot image stabilization with active mode 2 direction.
Newest Sony camera which is named the DSC-WX80 will be available in the Cyber-Shot family. The camera feature comes with a 8x zoom with image sharpness level is no less than a DSLR.
Sony Cyber-shot WX80 is already available in the market from February 22, 2013, in a variety of colors such as white, black and red. Price of this Sony digital camera is $ 199.99
What is aperture? it is one of the things that can make a photograph dimension. Thanks to the aperture, the pictures miraculously produced.
For simplicity, the aperture is the size of the lens opening when the photo was taken.
Aperture? Yes, the aperture is a hole in the lens. This entry hole where light can be set magnitude. If the hole the greater the incoming light will be increasingly, and vice versa.
Do not be surprised if you see these numbers [highlight color = "yellow"] f/2.8, f / 4, f/5.6, f / 8, f/11, f/16, f/22 [/ highlight] and so on. These are numbers that represent large-small aperture.
The thing to remember is f/2.8, larger than f/16. Moves from f/2.8 to f / 4 will reduce the light one f-stop. The order of the aperture in the highlights above are standard sequence in one f-stop.
That often confusing newbies is the value of a small number like f/2.8 turns out, large aperture (where the light coming more). Remember, f/2.8 is a large aperture and f/22 is a small aperture. It might sound strange, but over time we will get used.
Aperture and Depth of Field.
Aperture determines the dimensions of our photos. More precisely is the setting depth of field or depth of field (DOF). It will impact directly to the DOF.
Large aperture (f/2.8) will make the DOF gets thinner, it is often used for portrait photography. Because it can isolate objects with the background. If you look at portraits with background blurry, then certainly the photographer using a large aperture.
In contrast to landscape photography, photographers need a wide DOF. From the object closest to the camera up to a distance, as much as possible focus. It is time we using a small aperture (f/22). We can also apply the principle of hyperfocal distance.
The most important thing to do is do the experiment yourself. Use aperture creatively, you might want to try photographing landscape with f/1.8? Not a problem!
Camera Bags
Various types of camera bags available on the market, from the backpack, belt, sling-slide (sideways) until which is similar the suitcase. Clearly, the function of a camera bag is to make us can keep the camera and lens that we had during traveling safely. Not fall, safe from collision and safe from water.
Cleaning Kit
To maintain the condition of the exterior and the camera lens to keep it clean, you need a microfiber cloth and a special cleaning fluid. Especially for the lens, as far as possible, you protect the lens with UV filter, usually for the lens, just use the blower. Cleaning kit can be purchased at camera stores.

Tripod
Tripod, monopod, Gorillapod, whatever its function is to help you take sharp photos while taking a long exposure shutter. Compared to other types, a tripod is still the most popular, because it is relatively more reliable and resilient.
Make sure you buy a tripod with sufficient load carrying ability, legs extended quite easily (and shortened), has a mechanism of insertion and removal of the camera is nice and has a flexible head movement (I recommend the type of ball head).
External flash
External flash will drastically improve the quality of your photos than when you use a flash innate inherent in SLR cameras. Have a far greater power, control ability is much more flexible, and we can set up the lighting that falls into objects more easily.
Shutter Release.
Besides a tripod, extra accessories that will increase the sharpness of your images is the shutter release. With the shutter release, we do not need to push the shutter button on the camera, just use the shutter release so that you can activate the shutter from a distance. Yes, the function is similar to your TV remote control. Shutter release is available in 2 options: wired and wireless.
DSLR camera allows a person to take many photos according to their creativity, but to know and understand the camera settings definitely takes a little time to adapt. Believe it or not if you wanted to quickly produce good photographs, it might be frustrating, but nevertheless, the only way is to make sure your camera is set up properly in order to produce the photographs as you desire.
Setting tips digital camera:
1. Quality Control
Did you ever notice that the file format you use in photographing? Do you prefer to use the RAW format instead of JPEG? The photos were taken using RAW format will have more flexibility when doing post production or editing software like a Photoshop or GIMP.
Use the ISO between 100 to 400, and try to get the light sensitivity of lace. Some digital cameras will generate noise on high ISO. Noise is usually in the photo looks like a grain of sand.
For White Balance, you can let it automatically, but if you have confidence about its use according to the lighting conditions when shooting, then please you set more detail, such as the Tungsten or Cloudy
2. Key Control
Aperture and Shutter Speed can be said to be very crucial. The impact of the combination of these two settings is not only on the amount of light that enters the lens, but also on how you photograph will be generated.
Aperture controls the depth of field by determining which areas are going to look sharp, if you choose a narrow depth of field with sharp Foreground and Background blur, so my friend had to use a wide aperture (eg f/2.8), and vice versa. Shutter Speed controls whether the object motion recorded 'freeze' or blur. The slower the shutter speed, then there will be more motion blur that is created.
3. Setting the AF and Drive Modes
DSLR camera offers multiple focus modes. The main focus of the two settings is Single-Servo for silent objects, and Continuous-Servo to object motion. Most cameras allow users to use manual focus.
Drives mode allows us to determine whether we are going to take a picture with every single frame shots or more than one snap as long as we press the Shutter button.


