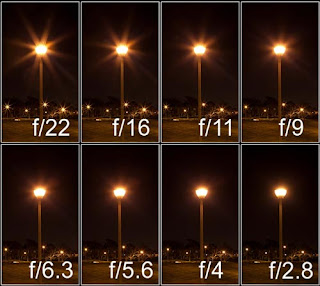
Making night light source seemed to glow like a star makes our night photos look better. This effect is usually called a starburst effect. To create a starburst, the fundamental thing we must understand is makes the aperture as small as possible, it means we should use a large aperture number (f/11 up to f/22) and should utilize a lens that has a shorter focal length.
Why should it be like that? well, the explanation would be long. In short is the physics of light will experience diffraction (spread) as it passes through a narrow hole. Nature of the propagation of light is what makes the light source (lamp, moon, sun) will look glowing and has a tongue, the tongue amount will depend on the number of aperture blades in your lens, see spec lenses you have, there will be written "aperture blade".
If still unclear, please see the following picture:
The image above shows, the smaller the aperture (the larger the f number), the tongue will light up. While in a small f number, the visible light source with no burst at all.
Tips for Night Photos Starburst:
1. Use a Tripod - Taking photos at night with a large f number, for example photo above to f/18, shutter speed will makes very long time, over 25 seconds bfoto why. So make sure you use a tripod so the images are not like painting graffiti.
2. Notice the camera settings - For type of photos like this, use a large f number: f/11 or greater. Set the ISO at a low rate, below 400, because we will be shooting long exposure. You can use the manual mode or aperture priority, which clearly notice the camera metering. For night shooting as there is a tendency to over-exposure results (too bright), so use exposure compensation figures vary depending on the surrounding environment, try to use as under 1 stop early and adjust afterwards.
3. Setting Focus - With a large aperture number, we will not think too much about focus, but if you want to safely take the focus point manually, or set at infinity.
4. Take advantage of the camera alerts highlight - you know, right? The bling-bling you know which a warning appears on the LCD when we are shooting a bright subject.
5. Start Taking photos - and do not be lazy to repeat and change the settings if the results are not as desired.
